Add voiceover and subtitles to an Opus 5.5 video project
Align narration and sentence captions in an Opus 5.5 Remotion project. Get the working MP4, WAV, SRT and source, with timing checks and fixes for drift.
 Ofox
Ofox 
To add voiceover and subtitles to an Opus 5.5 video, treat audio timing as project data. Create or record the narration, measure it, map each sentence to the timeline, then render the audio and captions together. Asking the model to “make the subtitles sync” without giving it actual timing is not enough.
This tutorial uses the same real-screenshot project as our product demo walkthrough. You can start from its downloadable files without completing that article first. The goal here is a narrated 30-second MP4 with readable sentence captions, an editable timing source and a separate SRT—not a new prompt collection or an unverified promise of automatic dubbing.
Watch and inspect the audio example
Actual Remotion export with an English synthetic reference voice. The voice is deliberately a timing aid, not a demonstration of professional narration quality. Captions follow whole sentences and include reading holds.
Download the complete project, narrated MP4, reference WAV and English SRT. The five-language articles share this English example; we are not presenting it as five localized audio productions.
The actual model call used claude-opus-5-5 in first-party Claude Code to generate Remotion code. It received filenames and written scene instructions, not image pixels or an audio recording. We then supplied the real source captures, generated the reference voice with eSpeak NG, corrected the code and rendered locally. This division of work is central to the tutorial: Opus wrote code; the speech engine made audio; Remotion made the final file.
Choose the right timing workflow
There are two common starting points. If your script and scene durations are still flexible, record or synthesize the approved voice first, then fit the visuals to its pace. If the video must fit an already approved 30-second slot, define the scene windows first and shorten any sentence that does not fit naturally.
Our example follows the second route. It has five existing scenes and five short sentences. Each audio segment must fit inside its assigned caption window; the reference-audio script rejects a segment that exceeds the end time. That check catches a real class of synchronization error before rendering.
| Starting material | Recommended approach | Main risk to check |
|---|---|---|
| Approved continuous narration | Measure/transcribe it, then place visuals and captions around the actual speech | Guessing sentence timing from word count |
| Fixed-duration product video | Write short sentences for each scene; measure each recording | Rushing or clipping a sentence to keep a fixed cut |
| Existing video with speech | Obtain timestamps from the actual soundtrack, then review them | Treating an automatic transcript as a verified subtitle file |
| Multilingual version | Re-record and retime each language | Reusing English timing after the spoken duration changes |
Remotion’s caption documentation covers importing, displaying and exporting captions. This project intentionally uses a small JSON sentence schedule so the timing is visible and easy to audit. It does not run automatic transcription or forced alignment.
Start with the provided voice, then replace it
Install Node.js and npm before running the project. The optional terminal media checks below also require a separate FFmpeg installation, including ffprobe; npm ci does not install that shell command. You can render through the supplied npm scripts without using the optional inspection commands.
Unzip the archive and run the project from its root:
npm ci
npm start
Choose DemoNarrated. The archive already contains public/narration.wav, so rendering does not require installing a speech engine or buying a voice service. Check the first sentence near the beginning, the documentation sentence around 13 seconds, and the last sentence near 27 seconds.
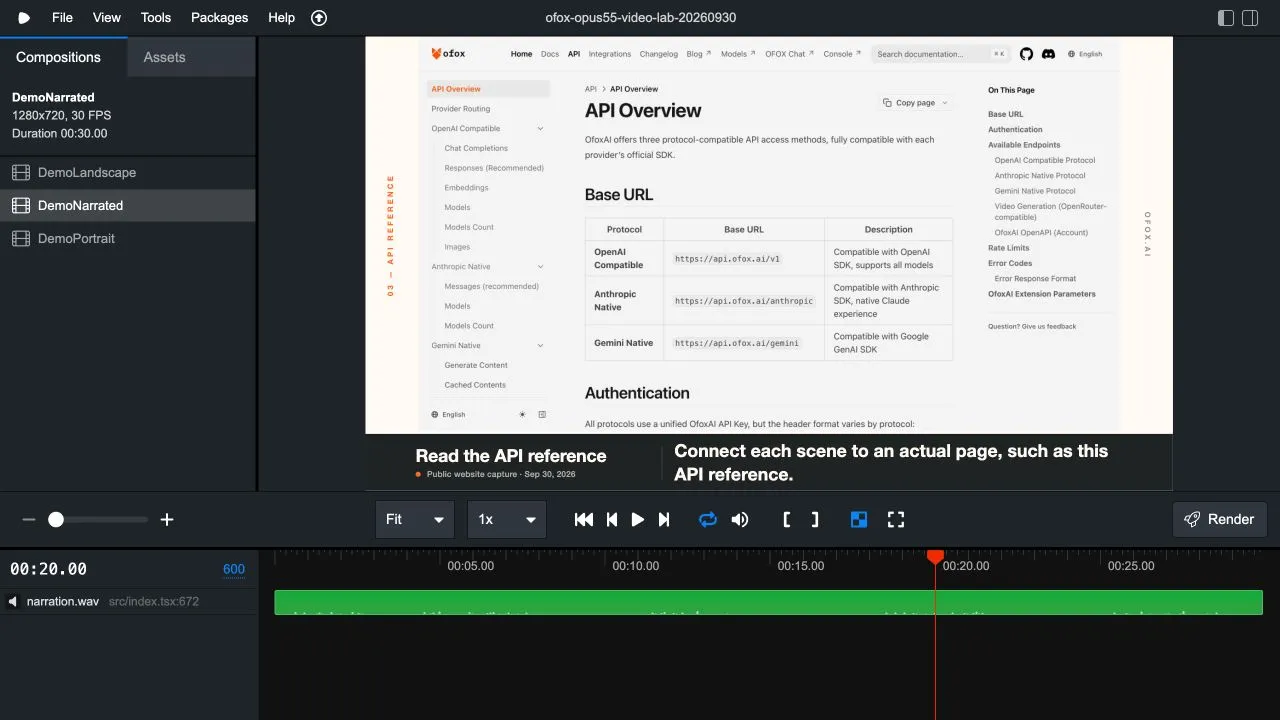
Real project preview with a WAV audio track. A visible waveform proves that audio is present in the project; it does not establish pronunciation quality or word-level alignment.
To reproduce the reference voice, install eSpeak NG through its documented route for your system, then run:
python3 scripts/make_audio.py
npm run render:narrated
We used eSpeak NG 1.52.0, the en-us voice and a speed setting of 190 words per minute. This formant-based voice is intentionally synthetic. It is useful for testing a timeline before choosing the final narration; the number is a tool setting, not a guarantee that every sentence has an identical speaking rate.
For a finished campaign, use a recording or voice output you are authorized to publish. Listen for the product name, abbreviations, punctuation pauses and the final word of each sentence. A correct transcript cannot establish whether a voice sounds natural. This article’s measured checks concern duration, placement and visible captions; they are not a human pronunciation or performance review.
Use one schedule for the WAV, captions and SRT
Open scripts/make_audio.py. Its LINES array is the reference source: each entry has a start time, a caption end and text. Running the script creates the 30-second WAV, src/captions.json, public/captions.en.srt and audio-timing.json. The composition imports the generated JSON, which avoids keeping a second manually edited caption list in the video code.
The measured reference segments are:
| Sentence | Start | WAV segment duration | Segment ends | Caption ends |
|---|---|---|---|---|
| A clear product video starts with a clear brief. | 0.35 s | 2.664 s | 3.014 s | 3.60 s |
| Show the real interface. Here, we begin with the model catalog. | 4.35 s | 3.681 s | 8.031 s | 9.80 s |
| Then show where a viewer can find the documentation. | 11.35 s | 2.917 s | 14.267 s | 16.80 s |
| Connect each scene to an actual page, such as this API reference. | 18.35 s | 3.743 s | 22.093 s | 23.80 s |
| Keep the message simple. Plan, build, and verify. | 25.35 s | 3.537 s | 28.887 s | 29.50 s |
These durations include the generated segment’s trailing samples. They are not measurements of individual phonemes. Captions deliberately remain visible after speech; the documentation sentence has about 2.53 seconds of additional reading time after its WAV segment. If you want tighter subtitle timing, shorten that hold after checking the actual narration.
The script creates silence around each segment and places the audio at the listed absolute start. It does not speed up a too-long sentence to force it into a window. If a revised sentence no longer fits, its explicit error tells you to shorten the sentence or move the end time before rendering.
A continuous replacement recording needs a different preparation step. Export a single full-length public/narration.wav, then edit src/captions.json and the SRT to match the actual recording. Do not run make_audio.py afterward unless you intend to overwrite that recording with the reference voice. Keep the original recording and the generated example in separate saved versions.
Convert seconds to frames carefully
The composition runs at 30 fps. A caption at 11.35 seconds falls between video frames. The final code uses Math.floor(start * fps) for the first visible frame, so that sentence appears at frame 340, about 11.333 seconds—slightly before the voice starts. It has no entrance fade that would hide the first spoken word. A short exit fade occurs during its final six frames.
const first = Math.floor(caption.start * fps);
const last = Math.round(caption.end * fps);
const visible = frame >= first && frame < last;
This illustrates the final visibility rule; the complete component also sets text layout and the end fade. Frame rounding is expected. Do not claim sample-accurate audio alignment from a 30-fps visual timeline.
The supplied Remotion 4.0.424 project imports Audio from remotion and resolves the WAV with staticFile. Current Remotion documentation describes that older HTML5 component as Html5Audio and recommends its newer media component for new audio integrations. Keep this archive’s pinned versions while reproducing it; do not combine a current-documentation API change with an unexplained package upgrade.
Keep subtitles readable without hiding words
The landscape composition gives captions a dark band separate from the screenshot. During the documentation and API scenes, the scene title sits on the left and the sentence caption on the right. The portrait version stacks image and captions vertically; use the vertical-video tutorial for its geometry.
Our English captions use 28-pixel text in landscape and 30-pixel text in portrait. These are project values, not universal social-platform rules. The chosen sentence lengths fit the checked layouts. A longer translation might not.
The initial model code limited text to two lines with CSS line-clamping. We removed that rule because it could silently hide the third line after an edit. The correct fix for an overlong subtitle is to split or rephrase it, enlarge the space, or revise the layout—not to make missing words invisible.
When changing text, check the first, longest and last captions at the intended display size. System font fallback can alter line breaks; the archive does not guarantee identical typography on every operating system. If you need a fixed brand font, bundle an appropriately licensed font, load it before rendering, and repeat these checks.
Ask Opus for a bounded timing revision
This adaptation prompt is useful after you have measured your own voiceover. Replace the placeholders with real times; it is not an additional model test.
Update the existing DemoNarrated composition only.
Keep the approved screenshots, 30 fps and current scene order.
The replacement narration is public/narration.wav.
These are measured sentence intervals, in seconds:
[paste start, end, exact spoken text]

Use one caption data source. Preserve every spoken word.
Show each sentence before or at its first spoken word; explain frame rounding.
Do not invent per-word timestamps or automatic transcription results.
Allow a reading hold only where I explicitly provide one.
Do not use line-clamping to hide overflow.
If a sentence crosses its scene cut, identify it instead of silently trimming audio.
Return changed files, the timing assumptions and the frames to inspect.
After a change, compare the text against the narration, then verify the visuals. If a line describes the API page while the catalog is still on screen, both files may be individually valid but the combined story is wrong. Correct the shared scene schedule or the recording; a caption offset alone will not repair mismatched narration.
Export and diagnose the actual file
npm run render:narrated
ffprobe -v error -show_entries stream=codec_name,codec_type,duration,sample_rate \
  -show_entries format=duration -of json out/narrated.mp4
The rendered example has an H.264 video stream and an AAC audio stream. Its video timeline is 30 seconds; compressed audio can report a slightly different stream/container duration because of encoder padding. Our reference WAV is exactly 30 seconds. Check audible content and synchronization rather than interpreting a small AAC tail as a scene-duration error.
| Symptom | Likely place to inspect | What to change |
|---|---|---|
| Entire MP4 is silent | Composition, mute flag, WAV path and stream metadata | Use render:narrated, verify the audio asset, and ensure the render was not muted. |
| Every sentence is late by the same amount | Leading silence or a shared start offset | Correct the single offset and inspect the first and last sentences again. |
| Drift grows through the video | Wrong duration assumptions, audio speed or source timeline | Measure the actual recording; do not patch each caption from guessed word counts. |
| One sentence crosses a cut | That sentence’s duration and scene boundary | Shorten/re-record it or extend the scene and all dependent timing. |
| Words are missing on screen | Text wrapping and fixed caption box | Split the sentence or resize the layout; never conceal the overflow. |
| Preview has sound but final export does not | Final file and render command | Inspect the MP4’s audio stream, not only Studio’s waveform. |
| SRT and burned-in captions differ | Last edited source and regeneration order | Regenerate from the same schedule, or update both deliberately for a replacement recording. |
Before delivery, play the complete exported file with sound, check sentence starts and ends, and inspect the version uploaded to your publishing platform. Burned-in captions remain visible in the pixels; a separate SRT depends on whether that platform supports and enables it. The example supplies both, but does not claim either was uploaded to a social channel.
Keep the audio work separate from model access
The Opus 5.5 model entry identifies the model relevant to this coding workflow. This example does not establish Ofox TTS availability or billable video-rendering behavior; its recorded model call used first-party Claude Code and its audio was created locally.
Use the main Opus video guide for the overall production path, the screenshot demo tutorial for source selection, and the portrait adaptation before sending the piece to a mobile-first format. A reliable handoff includes the final MP4, the WAV, the matching subtitle file and the exact project version that produced them.
Frequently Asked Questions
- Did Opus 5.5 generate the narration?
- No. Opus generated the video project code. This example uses an explicitly synthetic eSpeak NG reference voice, and Remotion combines the WAV with the video.
- Are these word-synchronized subtitles?
- No. The example uses five scheduled sentence captions, with extra reading time after each audio segment. Word-level highlighting needs real word timestamps and separate verification.
- Can I replace the voice without regenerating the video design?
- Yes. Replace the audio and update the caption timing to match it, keeping the approved visuals. If the new voiceover exceeds the scene or project duration, revise the shared timeline before exporting.