Make a product demo from real screenshots with Opus 5.5
Build a 30-second product demo with Opus 5.5 and Remotion. Download the tested project, real screenshots and MP4, then adapt the storyboard to your product.
 Ofox
Ofox 
Opus 5.5 can help turn a product brief into an editable video project. In this tutorial, it writes the React/Remotion code; real website captures supply the interface; Remotion exports the MP4. You will build a 30-second overview with five scenes, replace its screenshots, and check whether the final video still tells the truth about the product.
This is for operators, founders and content creators who can run a local project but do not want to animate every element by hand. It is a screenshot-based walkthrough, not a recording of a user completing an API request. For the broader workflow and alternative prompts, start with our Opus 5.5 video production guide.
Watch the result and get the working files
Actual local render: 1280 × 720, 30 fps, 900 frames. This version is intentionally silent. The interface is English and was captured on September 30, 2026.
Download the complete project, the MP4, or the original model brief. The same project also includes narrated and portrait compositions, which have their own linked tutorials below.
What was tested: we called claude-opus-5-5 through an existing first-party Claude Code session, retained its generated source, and rendered it locally. The model received screenshot filenames, dimensions and a written description; it did not inspect their pixels in that call. We reviewed the actual images and edited the code afterward, including portrait crops and caption handling. This is one reproducible project, not a model benchmark or a claim of one-prompt commercial quality.
The archive contains src/index.tsx, the package lock, source captures, reference narration, English SRT, the brief and reproduction instructions. It does not contain credentials or node_modules.
Decide what the screenshots can demonstrate
Our brief is deliberately narrow: introduce the model catalog, show the documentation, and point to the API reference. These are three public pages that a viewer can verify. We do not animate a fake cursor, invent an API response, or imply that navigating documentation means a request ran successfully.
Before collecting assets, write one sentence describing the viewer’s next action. For this example: “Explore the catalog, then find the documentation relevant to your integration.” A video that promises five unrelated benefits will need more evidence and a different storyboard; it is not improved simply by adding more transitions.
| Source | What appears in the video | What it does not prove |
|---|---|---|
| Ofox model catalog | Navigation, search and new-arrival area | Current price, availability for every account or model performance |
| Ofox documentation | The documentation landing page | That the displayed sample request was executed |
| API overview | Where the API reference lives | That every documented endpoint was tested in this project |
Keep a small asset manifest with filename, original URL, capture time, dimensions and intended claim. Inspect each image at full size. Exclude balances, personal identifiers, private conversations and real API keys. If an interface is in the wrong language, capture the real language setting or explain the English interface in the article; do not replace its text to simulate localization.
Our three originals are 1280 × 720. The catalog shot shows only the top 320 source pixels because lower sections contain changing prices. That crop is an editorial choice, not a current-price verification. A dated capture should never be used as an evergreen pricing promise.
Build a storyboard before asking for animation
A useful storyboard gives the model a bounded problem: which asset, which message, which duration, and which result to preserve. This project uses the following fixed timeline.
| Time | Scene | Asset and intended message |
|---|---|---|
| 0–4 s | Opening | “One brief. A clear demo.” Introduce the task. |
| 4–11 s | Catalog | models.png, top 320 pixels only; show where discovery begins. |
| 11–18 s | Documentation | docs.png; identify the documentation page. |
| 18–25 s | API reference | api.png; show the reference location without claiming execution. |
| 25–30 s | Closing | “Plan. Build. Verify.” and a visible destination. |
At 30 fps, the cuts occur at frames 0, 120, 330, 540 and 750, with the composition ending at frame 900. This is a practical way to keep three output variants on the same timeline. It also makes a revision request specific: “hold the documentation scene longer” means changing known boundaries rather than regenerating an entire unspecified video.
For your own product, replace the scene messages before changing colors. A dashboard overview might show an empty state, a configured view and an exported report. Only use the latter two if you have genuine captures. If the story depends on an interaction such as uploading a file, substitute a real screen recording and describe its start and end; a screenshot with an animated pointer is not equivalent evidence.
Run the supplied project first
Use a machine with Node.js and npm. The archive pins React 19.1.0 and Remotion packages to 4.0.424 so the example does not depend on whatever release is newest when you read this. See Remotion’s coding-agent setup and licensing information for your own environment and organizational use.
Install Node.js and npm before running the project. The optional terminal media checks below also require a separate FFmpeg installation, including ffprobe; npm ci does not install that shell command. You can render through the supplied npm scripts without using the optional inspection commands.
Unzip the project, open a terminal in its root folder, then run:
npm ci
npm start
Open the local URL printed by the terminal. Choose DemoLandscape in the composition list. Scrub to 5 seconds: you should see the catalog crop, not a blank rectangle. Scrub to 13 seconds: the documentation capture should be visible. If these checks fail, fix paths before changing the design.
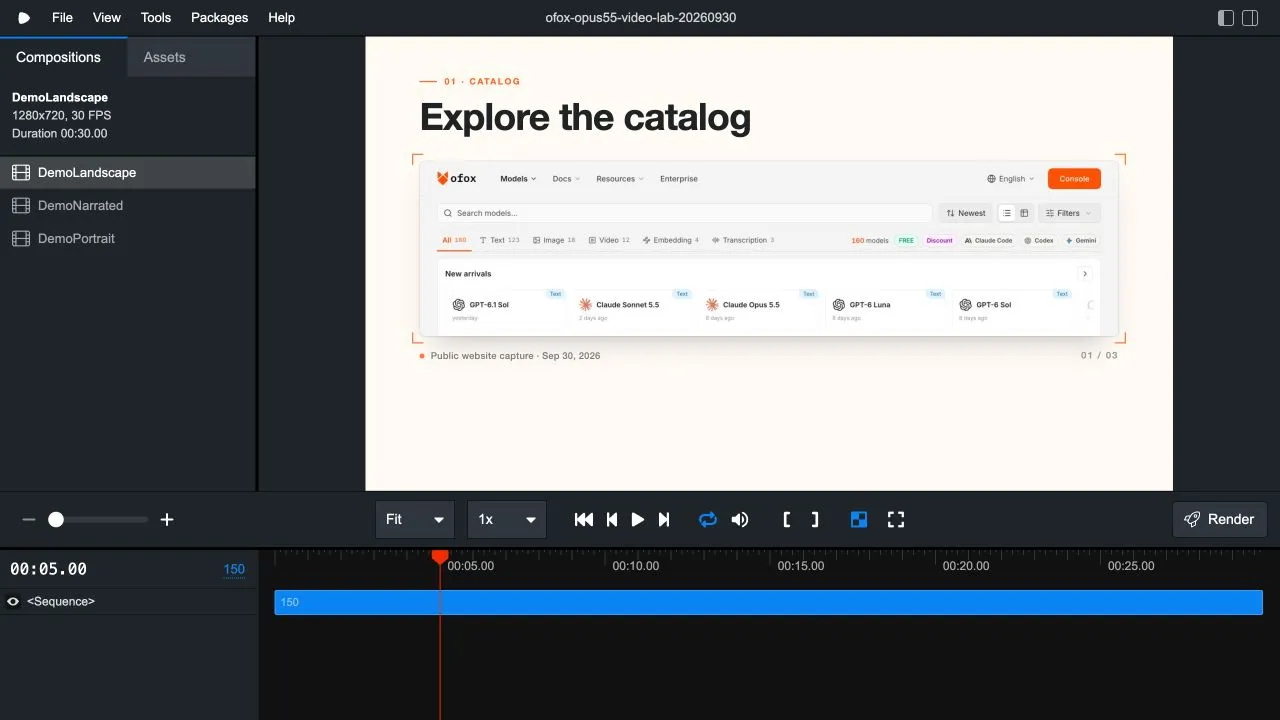
Real local Remotion Studio capture. This is the editable project preview; the downloadable MP4 above is the exported result.
The main files have separate jobs:
| File | What to change |
|---|---|
public/models.png, docs.png, api.png | Replace with your authorized source captures. |
src/index.tsx → SHOTS | Scene headings and asset filenames. |
src/index.tsx → SCENES | Shared scene boundaries in seconds. |
SRC_W, SRC_H, CATALOG_CROP_H | Dimensions and catalog crop assumption. |
BRAND, INK, CREAM | Editorial colors outside the product screenshots. |
package.json | Named preview and render commands. |
npm ci needs network access for missing dependencies. A first Remotion render may also download its headless browser. That is separate from model access: rendering the code already in the archive does not call Opus again.
Give Opus a brief it can implement
The original brief is downloadable above. This shorter adaptation template preserves the important constraints while letting you replace the story. It is not a second tested model run.
Create an editable product overview in the existing Remotion project.
Keep the installed package versions. Inspect the current source before editing.

Audience: [who watches]
Next action: [one concrete destination]
Composition: DemoLandscape, 1280x720, 30 fps, 900 frames.
Assets: [filename, dimensions, source URL, and what each image proves].
Use the real images with Img/staticFile; do not redraw the interface.

Timeline:
0-4 s: [opening statement]
4-11 s: [asset 1 and a verifiable message]
11-18 s: [asset 2 and a verifiable message]
18-25 s: [asset 3 and a verifiable message]
25-30 s: [closing and destination]

Keep screenshot proportions. State every crop in source pixels.
Do not show private data or turn old prices into current promises.
Drive motion with useCurrentFrame/interpolate/spring, not CSS animations.
No fake cursor interactions, fabricated results, new packages or network calls.
Return the changed files and explain how to preview and render them.
If your agent can view images, give it the actual approved assets and still inspect its output. If you supply only dimensions and descriptions, as we did here, do not assume it understands which on-screen control matters. That distinction explains why reviewing the rendered screenshot is part of the workflow rather than an optional finishing step.
Keep the real interface legible
Our landscape catalog viewport is 1120 pixels wide. A 1280 × 320 source crop therefore becomes 1120 × 280: both axes use the same scale factor, 0.875. The full 1280 × 720 documentation capture becomes 1120 × 630. Its title and caption occupy a separate band below the image, so they do not cover the page.
This arithmetic matters. Setting a screenshot to fill an arbitrary box can stretch controls, cut off the relevant label, or make an inactive control resemble something else. In the supplied Shot component, image dimensions remain proportional and an overflow container defines the visible crop. The original PNG is preserved.
Use modest motion. The example’s camera scale moves from 0.985 to 1; large zooms would soften small UI text. The opening rectangles are clearly editorial graphics, while the product views are actual captures. Keep that separation when adapting the piece: decoration can explain the story, but it should not fabricate evidence inside a product screen.
At phone size, a full desktop page may still be too small even if the export is technically sharp. For a mobile audience, follow the portrait re-layout tutorial instead of shrinking this entire landscape frame.
Revise a scene without losing a working version
Save the working project before each substantial revision. Ask for one change with an acceptance condition, such as:
Change only the catalog scene. Preserve its 4-11 second interval and
source crop y=0..320. Increase the heading-to-image spacing by 12 pixels.
Do not alter the screenshot, later scenes, composition size or dependencies.
At frame 150, the heading, complete crop and capture label must not overlap.
Inspect the diff and render the affected section before exporting all 900 frames. If the request changes scene duration, check SCENES, total duration, narration and captions together. A longer visual scene with an unchanged voice track is a timing change, not merely a design change.
In our actual revision, portrait documentation and API shots needed tighter source crops. We also removed line-clamping that could silently hide caption text after a later edit. Those corrections are included in the downloadable final source; the provenance note separates model output from editorial changes.
Export and verify the MP4
From the project root:
npm run render:landscape
ffprobe -v error -show_entries stream=codec_name,width,height,r_frame_rate,nb_frames \
  -show_entries format=duration -of json out/landscape.mp4
The expected video is H.264, 1280 × 720, 30 fps and 900 frames, with a 30-second timeline. This composition is muted by design. Do not diagnose it as a missing-audio failure; use DemoNarrated when following the voiceover and subtitle guide.
Check more than the file’s existence. Play the MP4 from beginning to end, pause at every scene, and compare its screenshots with the source. Confirm the destination is readable, no private data appears, and there are no accidental blank holds. Metadata proves dimensions and duration, not that the message is useful or accurate.
| Symptom | Check first | Correction |
|---|---|---|
| Image is blank or fails to load | Asset name, capitalization and public/ location | Keep staticFile('docs.png') aligned with the actual filename. |
| Screenshot looks stretched | Source dimensions and display ratio | Use one scale factor for both axes; crop with a viewport. |
| Image is sharp but unreadable on mobile | The size of the relevant UI region | Use a closer genuine crop or a portrait layout. |
| Wrong screen appears under a heading | The SHOTS file mapping | Compare each scene with the asset manifest. |
| Browser download or render fails | The complete terminal error and available disk space | Resolve that dependency or environment issue before asking the model to rewrite the scene. |
| Output has no sound | Composition and render script | The landscape example is intentionally silent; render the narrated composition for audio. |
Put the finished video to work
Keep the editable project, exact assets and exported file together so a changed product screen can be updated without inventing a new story. Replace the sample’s Ofox destination and screenshots when demonstrating your own product. Do not reuse a public-page overview as proof of a private workflow you have not tested.
The Opus 5.5 model page is the relevant Ofox model entry; this tutorial’s recorded code-generation call used first-party Claude Code, not Ofox’s API. Ofox’s model entry and documentation are useful next destinations, but they are not a claim that Ofox is the Remotion renderer.
Continue with adding voiceover and subtitles or rebuilding the layout for vertical video. The main video guide connects the whole workflow.
Frequently Asked Questions
- Does Opus 5.5 generate this MP4 directly?
- No. In this walkthrough, Opus 5.5 generated React and Remotion code. Remotion rendered the MP4 locally using real website screenshots supplied by the editor.
- Can I use screenshots instead of recording my screen?
- Yes, for a clearly labeled overview of actual pages. Screenshots do not prove a click, API request or product workflow succeeded. Record the real interaction if your claim depends on it.
- Do I need an API key to render the downloadable project?
- No model API key is required to render the supplied code locally. Generating new code with Claude requires your own access, and your use of Remotion remains subject to its license.