GPT Image 2.6 markup edits: circle an object and check the result
Make a transparent annotation, send a tested Ofox image-edit request and inspect what changed. Includes two real outputs, source files and validation scripts.
 Ofox
To guide a GPT Image 2.6 edit with a circle, send the original image and a separate transparent PNG annotation to the Images edit endpoint using markup. Describe the desired change in the prompt. Keep the annotation aligned with the original, and inspect the entire returned image: a successful selection does not mean every unmarked pixel stayed unchanged.
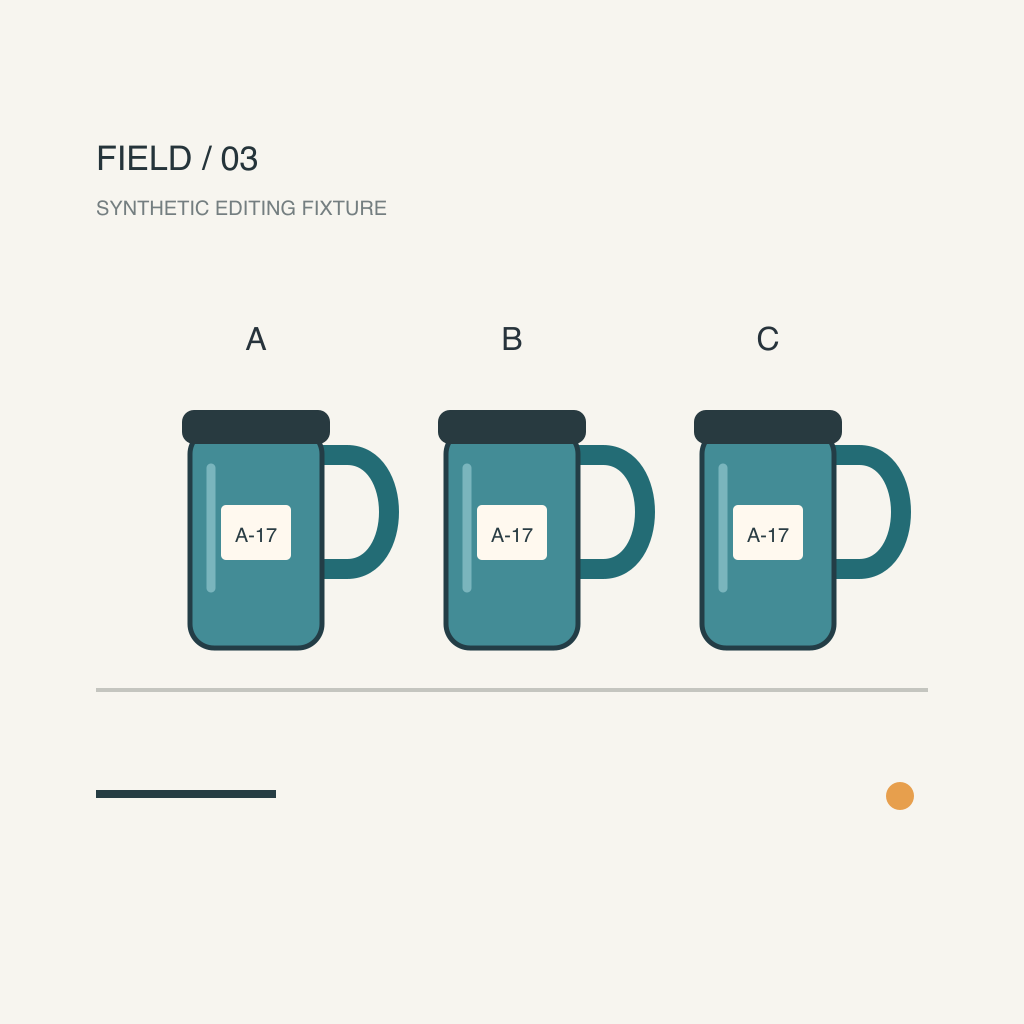
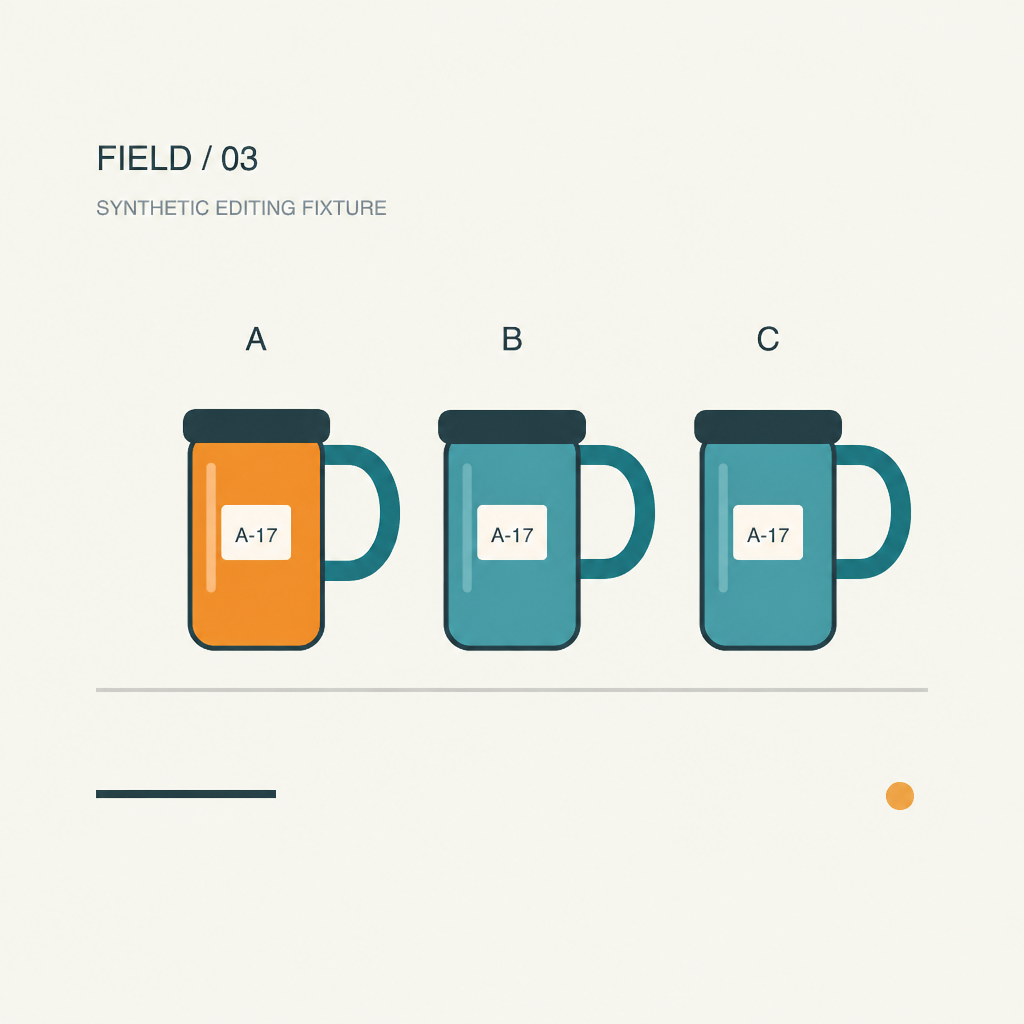
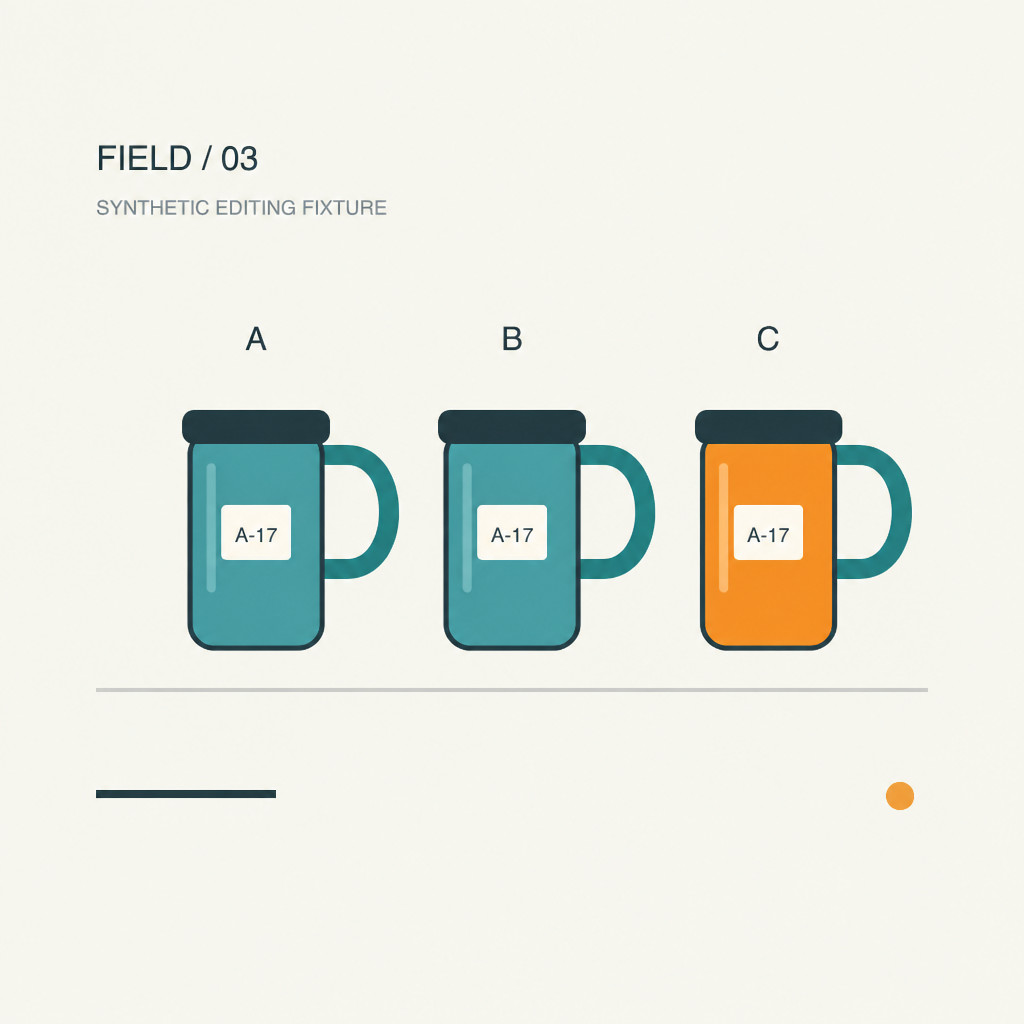
We tested this through Ofox on November 6, 2026. Two requests used the same three-mug illustration and the same prompt. Moving the red ellipse from the left mug to the right mug changed which mug turned orange. Both outputs also changed pixels outside the target. This guide includes the original files, actual outputs, request settings and local checks so you can examine that distinction yourself.
Download the example before making a paid request
Download the complete markup editing example. It includes the source PNG and SVG, two transparent annotation layers, two generated PNGs, the prompt, request metadata and three Python helpers. Downloading and inspecting these files does not call an API.
The source is an illustration we authored specifically for this test, not a customer photograph. Three teal travel mugs are labelled A, B and C; each carries the text A-17. The title, background, bottom line and orange dot give us additional areas to inspect. These deliberately simple features make a wrong target or accidental text change easier to see. They do not establish performance on faces, fine jewelry, real product photography or large batches.
Use Python 3 and Pillow for the local image checks. In a terminal, enter the extracted folder and create an isolated environment:
python3 -m venv .venv
source .venv/bin/activate
python3 -m pip install Pillow
These shell examples use macOS or Linux syntax. On Windows, activate the virtual environment with the command appropriate to your shell. The supplied decode_edit.py uses only Python’s standard library.
Decide whether you need markup, a mask or an exact composite
Markup is useful when the instruction is easier to point at than describe: change the circled mug, remove an object identified by an arrow, or revise one part of a crowded composition. The annotation communicates your intent; it is not the final artwork.
| Need | Starting approach | What to verify |
|---|---|---|
| Identify one of several similar objects | Separate markup layer plus a focused prompt | Correct target, annotation removed, other objects acceptable |
| Guide a regional edit with a transparency mask | A mask-based workflow | Mask interpretation and surrounding changes |
| Preserve an approved logo or background exactly | Keep the original asset and composite an accepted edit in an image editor | Layer boundaries, alignment and exact protected pixels |
The last row is an editing workflow recommendation, not a capability we tested in these two calls. If unchanged pixels are a contractual requirement, do not accept a generated full-frame image merely because it looks close. Our mask and product-preservation guide covers that separate problem.
According to the OpenAI image generation guide, markup is supported on the Images edit route for Image 2.5 and 2.6. It is not exclusive to 2.6. It applies to the first input image, and cannot be combined with mask or prompt_rewriter. The overlay must be a transparent PNG aligned with the oriented source dimensions; the documented limits are 16,777,216 pixels for each and 50 MB for the annotation. This tutorial uses one 1024 × 1024 input and a much smaller annotation file.
Prepare the annotation as its own transparent file
For the supplied example, use source.png as the image and markup-left.png as the annotation. The right-hand version is markup-right.png. The SVG files are editable source assets, not the files submitted to the API.
To prepare your own annotation in a layer-based image editor:
- Open the original and settle its orientation first. If your editor applies EXIF rotation, export a correctly oriented working copy before drawing.
- Add a transparent layer above the image without changing the canvas dimensions.
- Draw a clear circle around one target. Keep unrelated objects outside it where practical. Avoid covering important text with a thick mark.
- Hide the original layer and export only the annotation layer as PNG, retaining the full canvas rather than cropping to the drawing.
- Reopen the original and overlay together to check alignment. Save the original separately; do not replace it with a flattened marked-up copy.
A checkerboard drawn into an image is not transparency. Neither is a white PNG with a red circle. The annotation file must contain an alpha channel with genuinely transparent background pixels. A transparent-looking preview alone cannot prove that.
Run the supplied local check:
python3 preflight.py source.png markup-left.pngFor our file, it reports passed: true, size [1024, 1024] and an alpha range of [0, 255]. The checker rejects an opaque overlay, an empty transparent overlay, a mismatched-size overlay and a JPEG; we exercised all four negative cases locally. Passing means the file has the expected basic shape and transparency. It does not establish model access, correct circle placement or a successful edit.
Write one change and a concrete preservation list
Here is the exact prompt used for both requests, also included as prompt.txt:
Change only the body of the travel mug inside the red ellipse to warm orange. Keep its dark lid, handle geometry, cream A-17 label and label text unchanged. Keep the other two mugs, their colors, the A B C headings, FIELD / 03 title, background, bottom line and small orange dot unchanged. The red ellipse is an editing annotation: do not draw it in the final image. Keep the original framing and flat illustration style.Notice that the prompt does not say “left” or “right.” This lets the annotation carry the target location. It also distinguishes the mug body from its lid, handle geometry and label, and explicitly says the circle should not appear in the final picture.
For your own image, replace the object, action and protected details. Start with one revision rather than combining recoloring, relighting, repositioning and a background replacement. This makes the result easier to diagnose. A preservation instruction is a request to evaluate, not proof of preservation.
The Image prompting guide discusses focused edits and model-specific controls. We used quality=medium and complexity=low for this small task and omitted input_fidelity. These settings describe our test, not a claim that they are optimal for every image.
Send the request through Ofox
Our tested endpoint was https://api.ofox.ai/v1/images/edits, with the Ofox model ID openai/gpt-image-2.6-flare. Provider model IDs and gateway model IDs need not be identical; check the Ofox Images API documentation and your account’s available models before substituting a name.
The following request uses the supplied files. It consumes account credit. Set OFOX_API_KEY securely in your local environment; do not put it into the article, downloaded files or a shared notebook.
curl --fail-with-body --silent --show-error \
  https://api.ofox.ai/v1/images/edits \
  -H "Authorization: Bearer ${OFOX_API_KEY:?Set OFOX_API_KEY first}" \
  -F 'model=openai/gpt-image-2.6-flare' \
  -F 'image=@source.png;type=image/png' \
  -F 'markup=@markup-left.png;type=image/png' \
  -F 'prompt=<prompt.txt' \
  -F 'size=1024x1024' \
  -F 'quality=medium' \
  -F 'complexity=low' \
  -F 'n=1' \
  -F 'output_format=png' \
  -o response.json
Let curl set the multipart content type and boundary. Do not add a bare Content-Type: multipart/form-data header yourself. In curl’s form syntax, prompt=<prompt.txt reads the file contents as the prompt field; it is not a literal filename sent as the prompt.
If curl exits successfully, decode the response:
python3 decode_edit.py response.json my-left-result.png
python3 inspect_edit.py source.png my-left-result.png
The decoder checks for an error response and PNG signature, and refuses to overwrite an existing output. The inspection helper expects the supplied 1024 × 1024 fixture and its fixed crop coordinates. For your own photograph, change those coordinates to meaningful protected regions; do not blindly reuse the mug crops.
To repeat the right-target experiment, change only markup-left.png to markup-right.png, retain source.png, and use new response/output filenames. Each request is billable. Do not feed the left output into the right request if you intend to reproduce this comparison: that would introduce a different starting image.
What the two real outputs show
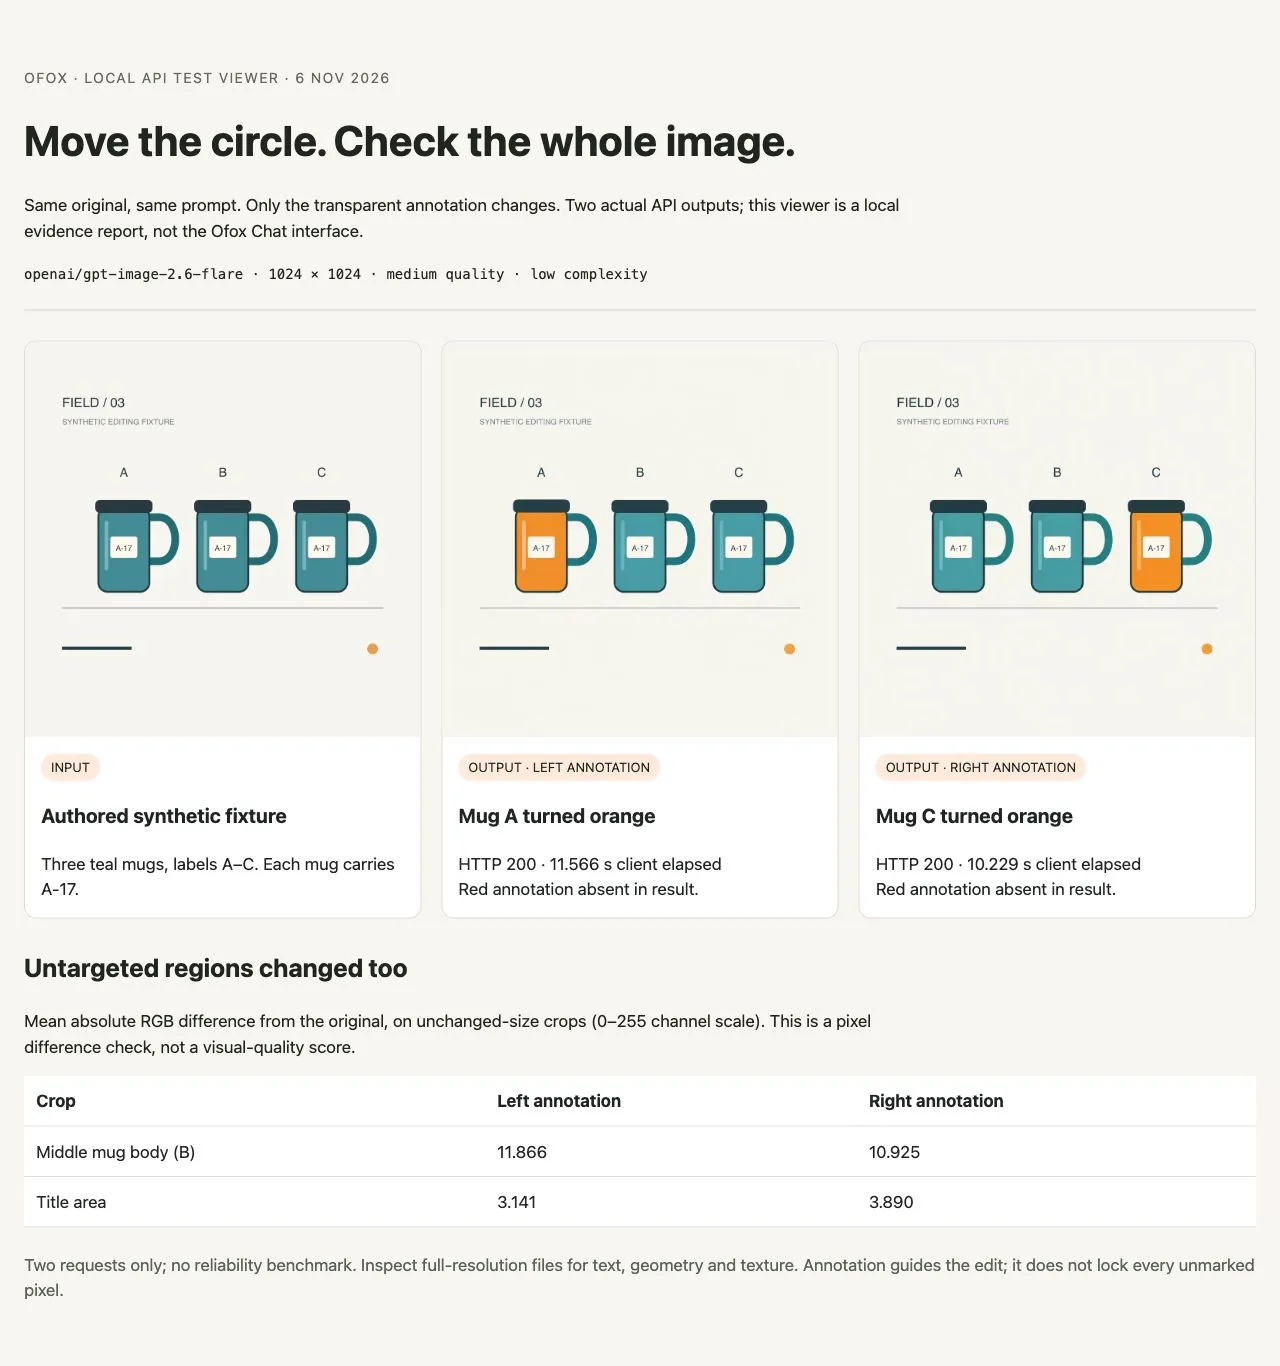
Browser screenshot of our English-language local evidence viewer. It displays actual API results and measurements; it is not the Ofox Chat interface. The decorative article cover is a separate conceptual illustration.
| Observation | Left annotation | Right annotation |
|---|---|---|
| Visible target change | Mug A body turned orange | Mug C body turned orange |
| HTTP response | 200 | 200 |
| Output | 1024 × 1024 PNG | 1024 × 1024 PNG |
| Client elapsed time, including network | 11.566 seconds | 10.229 seconds |
| Returned input / output tokens | 1,286 / 1,449 | 1,265 / 1,449 |
| Red annotation visible in final output | No | No |
There was one call per target, without retries. These two timings are observations, not a speed benchmark or service-level promise. The returned input token counts differed despite the shared prompt; this test does not establish why. We did not test Sunburst or compare vendors.
The labels remain readable and the intended mug changes color in both outputs. However, the generated images add subtle texture and shading. The other mugs still look teal, but their RGB values are not identical to the source. Open the original, left result and right result at full resolution instead of judging only the screenshot.
Our local script compares unchanged-size crops with the source. It computes the mean absolute difference across RGB channels on a 0–255 scale:
| Crop | Left result | Right result |
|---|---|---|
| Middle mug body, which neither request targeted | 11.866 | 10.925 |
| Title area | 3.141 | 3.890 |
| Bottom line | 1.853 | 1.527 |
These are pixel differences, not quality scores or universal acceptance thresholds. All five inspected crops—including target-body crops listed in the download—differed from the source. The measurements establish that these outputs are not exact copies outside the circled object. They do not measure every protected pixel or prove that a change is unacceptable for your use.
Accept the result against the intended deliverable
Before handing off an edit, inspect three separate things:
- Selection: the intended object changed, the neighboring object did not receive the requested orange recoloring, and the annotation disappeared.
- Meaning: labels, numbers, branding and the requested geometry remain correct. For this fixture, read every
A-17, not just the large A/B/C headings. - Preservation: decide whether slight texture or color shifts are acceptable. If exact identity is required, use pixel checks on the protected regions and retain original layers for compositing.
Record the original, overlay, prompt, model ID, settings, output and acceptance notes together. For a revision, change one cause at a time. A misplaced circle needs a new overlay; a correct target with excessive restyling needs a clearer preservation instruction or a different editing workflow. Repeatedly regenerating without identifying the failure makes the comparison less useful.
Try the image task in Ofox Chat
If you prefer a conversational workflow, start in Ofox Chat with the original image and a specific request: which object should change, how it should change and which details must remain. Inspect the returned image with the same selection, text and preservation checks.
Image 2.6 is available in Ofox Chat, but this article’s two tests used the API. We did not verify a Chat control that forwards a separate transparent layer as the API’s markup field. Uploading a marked-up reference in a conversation is not evidence that the same field or settings are used. Use the API steps above when you need to reproduce this exact two-file request.
Troubleshoot the file, request and result separately
If the response says Complexity 'low' is not supported, compare it with the Responses API complexity error case. That case concerns the Responses tool and gpt-image-2; it does not establish the same problem for this article’s Image 2.6 Images edit request. Check endpoint and model first.
| Symptom | First check | Next action |
|---|---|---|
| Overlay rejected or dimensions differ | Orientation and canvas dimensions | Normalize orientation, export both files on the same canvas, rerun preflight |
| White rectangle covers the image | Annotation alpha channel | Hide the original/background layer and export only the transparent drawing layer |
| Empty overlay passes your visual inspection | Alpha and visible stroke | Reopen on a contrasting background; the supplied checker rejects an all-transparent file |
| Wrong object changes | Alignment and ambiguous circle | Preview both layers together, isolate one target, preserve the original input |
| Red circle appears in the output | Flattened input or unclear instruction | Send the original separately and state that the annotation must not be rendered |
| Error after copying a mask example | Conflicting fields | Remove mask and prompt_rewriter from a markup request |
| Model not found or access denied | Exact account model ID and response body | Verify availability and credentials; do not retry with random model names |
| Successful response but no usable PNG | Error payload or missing expected image data | Inspect the JSON before decoding; preserve it for diagnosis |
| Other objects or labels drift | Full-resolution comparison | Reject unacceptable changes; revise one instruction or composite with protected original layers |
| Timeout or rate limit | Response/status and account limits | Check whether a request completed before retrying; repeated calls can add cost |
For output-format problems rather than regional edits, see the Image 2.6 GIF guide and SVG workflow. Those are separate deliverables with their own endpoint and inspection requirements. For model access and billing context, consult the Image 2.6 API overview; the token observations above are not a fixed per-edit price.