Seedream 5.5 multi-turn editing: protect details and check drift
Plan controlled image revisions with saved checkpoints, protected areas and a tested pixel checker. Learn when to retry an edit or use exact compositing.
 Ofox
For a controlled Seedream 5.5 editing workflow, keep an untouched master, make one requested change per revision and approve the result before it becomes the next input. Describe what must stay fixed as carefully as what should change. Compare the downloaded files, not just the latest preview.
ByteDance highlights sustained editing in its Seedream 5.5 announcement. That is a reason to test preservation on your own work, not a guarantee that every unrequested detail will survive. This article provides an evaluation workflow and tested local comparison code. We have not run a Seedream 5.5 edit sequence; the example prompts are untested and the supplied images are synthetic checker fixtures.
Start with an editing requirement you can actually verify
Consider a fictional product image: a travel bottle on a tabletop, a small A-17 label on the bottle and a thin blue stripe in the background. The requested delivery is a revised bottle color, then a changed cap color, while keeping the label, camera framing and background stripe intact.
That task has different kinds of constraints:
| Constraint | How to verify it | What a failure looks like |
|---|---|---|
| Bottle body changes to orange | Inspect the requested region | Color change affects the wrong object |
Label remains A-17 | Read the label against the approved text | A character changes or disappears |
| Framing stays fixed | Compare dimensions and object placement | Crop, zoom or perspective changes |
| Background remains unchanged | Inspect and compare protected pixels | Blue stripe moves or background colors shift |
| Final image is usable | Review at delivery size and full resolution | New edge defects or blurred small details |
Do not write “everything else unchanged” and leave acceptance undefined. A team may tolerate a small lighting adjustment in a concept image but require exact logo pixels for a final branded asset. Decide which standard applies before making the edit.
If a logo, legal line or product identifier must remain exact, retaining that element as a separate editable layer—or compositing the original region back into the final image—may be more appropriate than asking a generative model to redraw it.
Confirm the service before applying these steps
Use the Seedream 5.5 access guide to distinguish the announced model from account-specific availability. We did not find 5.5 in the Ofox public catalog on November 10, 2026. This guide does not supply an unverified API model ID or claim that Ofox exposes a Seedream-specific mask parameter.
The workflow below assumes you have a service that visibly offers Seedream 5.5 and accepts an image for editing. It does not assume a particular canvas UI. If the interface cannot select an earlier revision as input, download the accepted revision and start a new edit from that file using the service’s documented upload path.
Use an image you own or are permitted to process. Record its dimensions and retain the original download. Do not use a screenshot as the master if the original file is available: scaling and compression make later comparisons harder to interpret.
Prepare the master, change list and checkpoints
Create a folder with these files:
master.png
requirements.txt
01-body-color.txt
02-cap-color.txt
edit-log.csv
outputs/
In requirements.txt, write the fixed details in plain language. For this proposed test:
Keep the original canvas dimensions and camera viewpoint.
Preserve the bottle's outline, position and proportions.
The front label must still read A-17, with the same placement.
The blue stripe and all other background content must remain unchanged.
The first revision changes only the bottle body color.
The second revision changes only the cap color.
Reject a revision if it changes a protected requirement.
The downloadable checking kit includes an edit-log CSV. Record the parent file, prompt, output file, protected-region check, text check and accept/reject decision for each revision. File names are useful only if they identify the actual parent; final-new-final.png is a poor history.
Make the first revision
This is a proposed prompt, not a report of a successful model call:
Edit the attached image. Change only the travel bottle's body color to orange.
Keep the cap, label, bottle outline, position, proportions and camera viewpoint.
Keep the label text exactly A-17 and preserve its placement and size.
Do not change the tabletop, blue background stripe or any other background detail.
Keep the original framing and output dimensions if this interface supports them.
Do not add objects, shadows, captions or decorative text.
Download the original result as 01.png. Compare it with master.png before moving on. Read A-17; inspect the cap and background stripe; compare the whole frame for unexpected changes. A successful orange bottle is only one of the requirements.
If you reject it, record why and return to the master for the next attempt. Do not try to repair several unrelated changes through a long sequence unless that is the specific workflow you intend to evaluate. Otherwise, the test becomes a moving target.
Make the next revision from an accepted parent
After approving revision 01, save a clearly identified accepted copy. The second prompt changes the cap to pale blue while preserving the accepted orange body and the original fixed details:
Edit the attached accepted revision. Change only the bottle cap to pale blue.
Preserve the orange bottle body from this input.
Keep the label exactly A-17, with the same size and placement.
Keep the bottle outline, position, proportions, camera viewpoint and framing.
Do not change the tabletop, blue background stripe or other content.
Do not introduce any additional text or objects.
Compare revision 02 with revision 01 to see what the latest instruction changed. Also compare the final image with the original requirements, since a sequence can carry an earlier mistake forward even when the latest edit is clean.
Choose the parent deliberately. If the second revision requires the first change, use the accepted first revision. If it is an independent alternative, branch from the master instead. Keep those branches separate in the log so that you can reproduce the final composition.
Check protected pixels locally
The kit’s check_edit.py compares decoded RGBA values outside an allowed-edit mask. It neither calls an API nor changes the input files. The mask belongs to this checker; it is not a claimed Seedream request field.
Create 01-mask.png in an image editor at exactly the master image’s dimensions. Paint black wherever pixels must stay fixed and white in the region allowed to change. Save the mask as a lossless grayscale PNG. In this checker, any nonzero value is allowed to change, so keep protected areas truly black. Avoid a loose mask that accidentally excuses the label or background you wanted to protect.
Install Python 3 and Pillow in a virtual environment, then run:
python3 -m venv .venv
source .venv/bin/activate
python3 -m pip install Pillow
python3 check_edit.py master.png 01.png 01-mask.png
These activation commands use macOS/Linux syntax. Run them inside the extracted kit directory, or use full paths. Windows users should activate the environment with their shell’s equivalent command.
The script reports:
- How many pixels were protected.
- How many protected pixels changed at all.
- Their changed fraction and average absolute channel difference.
- The largest channel difference.
It stops if image dimensions differ or the mask contains no protected pixels. It does not silently resize one image to make the comparison pass.
What the local tests establish
Run the included positive and negative controls:
python3 check_edit.py fixtures/before.png fixtures/clean-edit.png fixtures/allowed-mask.png
python3 check_edit.py fixtures/before.png fixtures/drift-edit.png fixtures/allowed-mask.png
Both fixtures use a 100 × 100 image with a 20 × 20 allowed region, leaving 9,600 protected pixels. We verified that the clean edit changes zero protected pixels. The drift example changes one protected pixel and is reported as such. These controlled tests verify the checker, not Seedream performance.
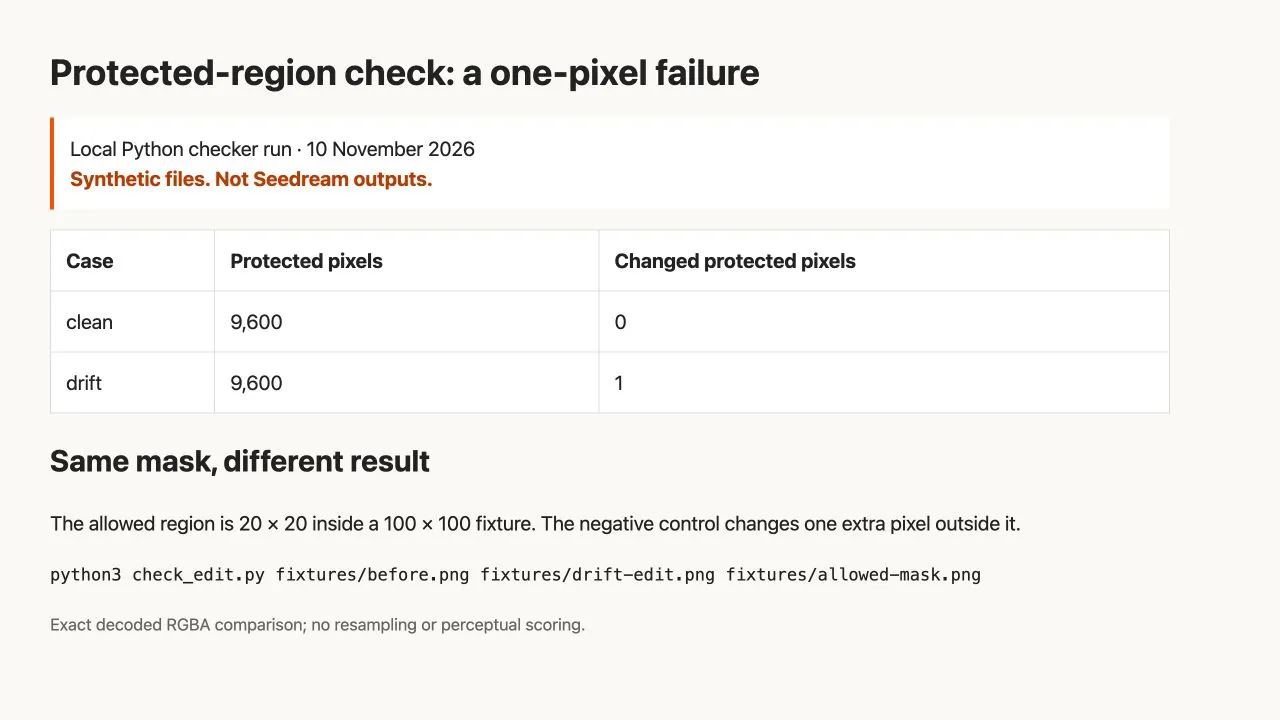
Browser screenshot of the local test record: zero changed protected pixels in the clean fixture, one in the negative control. Not a model benchmark.
The implementation uses Pillow’s image operations. It compares decoded channel values without color-profile normalization. Inputs need matching geometry and equivalent color interpretation. JPEG recompression, profile changes or changes to invisible RGB values beneath fully transparent pixels can produce numerical differences that do not correspond to a visible generative edit.
For that reason, keep originals in a lossless workflow where possible and review the actual content alongside the numbers. A low numerical difference can still hide a wrong digit; a high difference can reflect a changed export pipeline. No universal pixel threshold substitutes for the task requirements.
Recover from drift without losing the useful work
When you find a failure, identify its type before rerunning the model:
| Failure | Recovery |
|---|---|
| Wrong object edited | Use a less ambiguous description or a supported selection control, then restart from the accepted parent |
| Unrequested background change | Reject the revision; tighten the instruction and compare again |
| Critical logo or label changed | Preserve it as an original layer or composite rather than repeatedly regenerating it |
| Framing or dimensions changed | Check export settings and restart from the correct parent; do not resize away the evidence |
| Later edit erased an earlier approved change | Use the accepted checkpoint as input and explicitly preserve the approved change |
| Request failed before returning an image | Inspect the actual API error rather than changing visual prompts |
For the last case, see image API errors and request troubleshooting. If you are comparing this workflow with another model, the GPT Image 2.6 markup tutorial contains separate real outputs and documents its own route. Its markup field is not evidence that Seedream accepts the same field.
If you use exact compositing to repair an output, record that as an editing step. It is a valid production method, but the final image should not be described as an untouched model output. Inspect the join, lighting and edges so that a numerically preserved patch does not create a visible seam.
Accept the final revision, not merely the latest one
Reopen the final exported file, confirm the required body and cap colors, reread the label and check the original protected background. Preserve the master, accepted parents, prompts and final file together. A revision log lets someone else distinguish model edits from manual repairs and understand why a particular version was accepted.
If the final asset needs transparency, finish with the alpha and edge checks. If it contains a poster headline, date or price, use the text proofing checklist as a separate acceptance step. Pixel preservation, transparent delivery and correct text answer different questions; none replaces the others.